Labels for STDOUT and STDERR when developing Bash scripts

Posted on 22nd September 2023 | View comments


Time for my once-yearly blog post! This time, I'd like to post a tip when working on Bash scripts, and when you do, caring about STDOUT and STDERR is important as a responsible programmer. Let's take an example script, such as:

#!/usr/bin/env bash

set -xeou pipefail

echo "this should be stdout"
echo "this shoudl be stderr" >&2

If you run this as is, you should see something like:

$ ./t.sh
+ echo 'this should be stdout'
this should be stdout
+ echo 'this shoudl be stderr'
this shoudl be stderr

There's no visual difference between the output when reading it as a human. Well, there is a way to improve this, to help work on the script to ensure your stdout/stderr is being written appropriately. Simply append this little bit of redirection + sed magic, 2> >(sed 's/^/e: /') > >(sed 's/^/o: /'), to your command, such as:

$ ./t.sh 2> >(sed 's/^/e: /') > >(sed 's/^/o: /')
o: this should be stdout
e: + echo 'this should be stdout'
e: + echo 'this shoudl be stderr'
e: this shoudl be stderr

Notice how also, because I had set -x, the trace lines are also shown in the stderr stream. Naturally, this technique will need sed installed. Enjoy!

Git rebase pro-tip

Posted on 21st December 2022 | View comments


I have lost count of the number of times I have referred myself to my own Tweet to remind myself how to "lift and shift" a feature branch from one trunk to another. Therefore, I have decided to immortalise this content on my own blog!

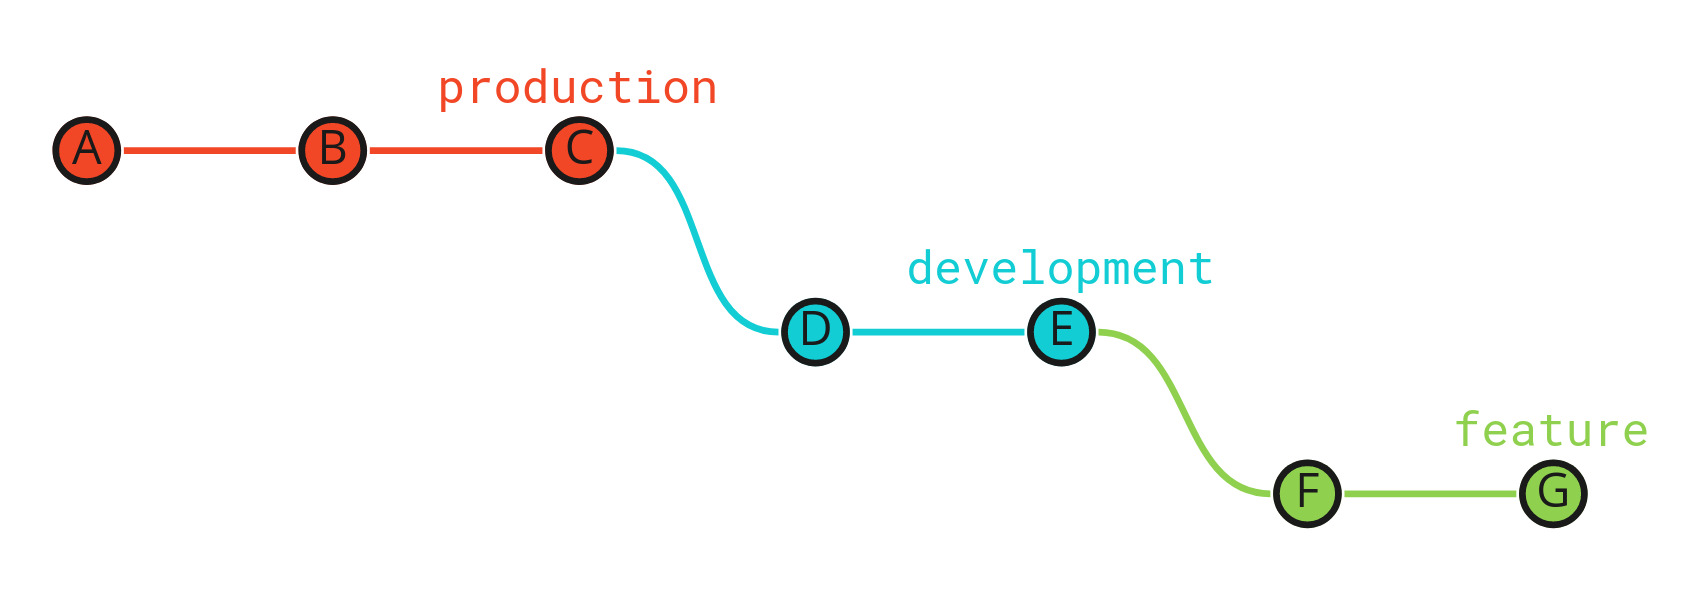
Some organisations I see have multiple trunks, and for this example, I'll use a production and a development branch. Let's say you have a branch called feature, which is based off development.

diagram showing current git branch tree

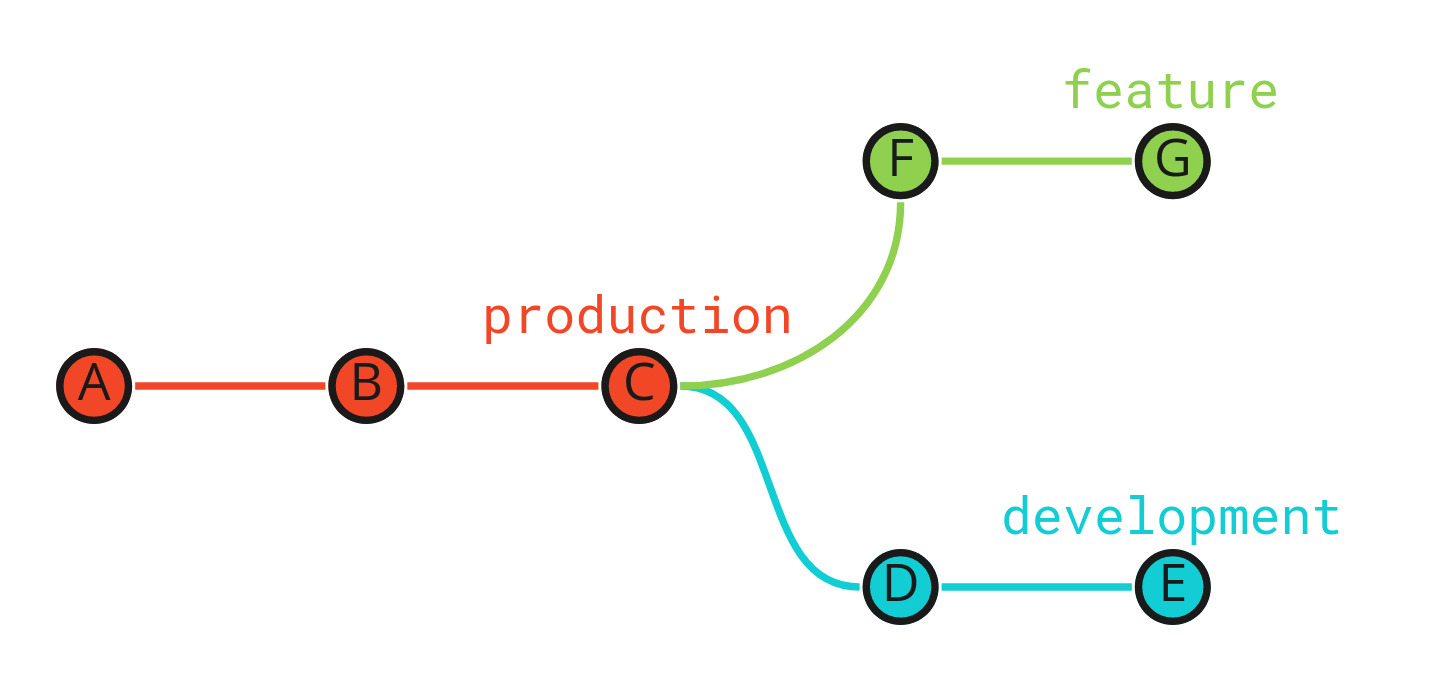
Given this current tree, you are asked to move your feature branch to the production branch, so the new tree should look like this:

diagram showing desired git branch tree

The right Git command for this is (with an optional -i to make an interactive rebase, which I highly recommend!):

git rebase -i --onto <new-trunk> <old-trunk> <your-branch>

So, in our example above, the command to run would be:

git rebase -i --onto production development feature

Need some help? I specialise in helping development teams to write high quality software.

Get in touch with me to see how I can start helping your team today:
Code Quality Series: Get Started with Static Analysis - NOW!

Posted on 27th August 2020 | View comments


Static analysis is increasing in popularity in the world of PHP web applications. Rightly so; in my experience, running static analysis in application build pipelines has uncovered previously unknown bugs. So how do we get started? As with any new technique or tool, introducing it into an existing project will not be without issue. However, the main static analysis tools in PHP have a way of creating a baseline; that is essentially saying:

All existing problems should be ignored, but any changes or additions should conform to the new rules.

Let's use the static analysis tool, Psalm, to fit this onto an existing project and create a baseline. First up, we can require the tool with composer:

$ composer require --dev vimeo/psalm

Once installed, we can generate a default configuration very easily by running:

$ vendor/bin/psalm --init

Psalm tries to detect a reasonable "error level" (similar to how PHP Stan uses numbers for levels), however, because we'd like to be strict, but with a known-issues baseline, we're going to tweak this a bit. Lets look at the existing configuration that Psalm generated:

<?xml version="1.0"?>
<psalm
    errorLevel="3"
    resolveFromConfigFile="true"
    xmlns:xsi="http://www.w3.org/2001/XMLSchema-instance"
    xmlns="https://getpsalm.org/schema/config"
    xsi:schemaLocation="https://getpsalm.org/schema/config vendor/vimeo/psalm/config.xsd"
>
    <projectFiles>
        <directory name="src" />
        <ignoreFiles>
            <directory name="vendor" />
        </ignoreFiles>
    </projectFiles>
</psalm>

Being an XML document, there is schema validation, so we can ignore xmlns:xsi, xmlns and xsi:schemaLocation. The resolveFromConfigFile is just a setting to say "all paths are relative to the config file". The projectFiles section should be checked to make sure everything you want to check has been included. I'd suggest adding your tests path too here, if you have them.

The most important change I'd suggest removing errorLevel="3" and replacing it with totallyTyped="true". The default errorLevel is 1 (strictest) in Psalm, so we can omit the attribute, and enable totallyTyped mode, which will complain about implicit type assumptions and so on. Note that in more recent versions of Psalm, if you're able to use them, the totallyTyped attribute has been deprecated and errorLevel="1" should do the trick.

So your new configuration should look something like this:

<?xml version="1.0"?>
<psalm
    totallyTyped="true"
    resolveFromConfigFile="true"
    xmlns:xsi="http://www.w3.org/2001/XMLSchema-instance"
    xmlns="https://getpsalm.org/schema/config"
    xsi:schemaLocation="https://getpsalm.org/schema/config vendor/vimeo/psalm/config.xsd"
>
    <projectFiles>
        <directory name="src" />
        <directory name="test" />
        <ignoreFiles>
            <directory name="vendor" />
        </ignoreFiles>
    </projectFiles>
</psalm>

Now you can run Psalm, like so:

$ vendor/bin/psalm
Scanning files...
Analyzing files...

E

<-- (LIST OF ERRORS REDACTED FOR BREVITY) -->


------------------------------
10 errors found
------------------------------

Checks took 0.35 seconds and used 51.655MB of memory
Psalm was able to infer types for 92.4051% of the codebase

In my example application, there are 10 errors that we need to now include into the new known-issues baseline we're going to generate next:

$ vendor/bin/psalm --set-baseline=known-issues.xml

The output is mostly the same except you might notice two additional lines:

Writing error baseline to file...
Baseline saved to known-issues.xml.

If you have a look into psalm.xml you'll also see the errorBaseline="known-issues.xml" attribute has been added to the root node. Now if you run vendor/bin/psalm again (with no parameters), you should see output like:

$ vendor/bin/psalm
Scanning files...
Analyzing files...

░

------------------------------
No errors found!
------------------------------
10 other issues found.
You can display them with --show-info=true
------------------------------

Checks took 0.17 seconds and used 64.879MB of memory
Psalm was able to infer types for 92.4051% of the codebase

Now, you can commit the known-issues.xml, your new psalm.xml and add the vendor/bin/psalm command into your CI pipeline, for example if you're using GitHub Actions, this might work as-is depending on the platform you're developing on and other necessary steps:

name: Run static analysis on PRs

on:
  push:
    branches: [ master ]
  pull_request:
    branches: [ master ]

jobs:
  static-analysis:
    name: "Perform static analysis"
    runs-on: ubuntu-latest
    steps:
      - uses: actions/checkout@v2
      - name: "Install PHP"
        uses: shivammathur/setup-php@v2
        with:
          coverage: "none"
          php-version: "7.4"
      - name: "Install dependencies"
        run: "composer install"
      - name: "Run Psalm"
        run: "vendor/bin/psalm"

It's worth mentioning that because static analysis does not run your code (hence the nomenclature "static analysis"), that you won't need things like your databases, caches, and so on to be running, so in many cases, a step very similar to above will work just fine.

From now on, any changes to existing code, or newly added code, where the errors have not already been included in the known-issues.xml will cause your build to fail.

If you are able to fix some of these issues, you can also "reduce" the baseline. This will check for any known issues that have been resolved, and remove them; doing this will not add any new issues to the baseline though:

vendor/bin/psalm --update-baseline

So there you have it; it's simple to get started with running static analysis in your PHP applications!

Need some help? I specialise in helping development teams to write high quality software.

Get in touch with me to see how I can start helping your team today:
Quicker Mezzio Applications with "Mini Mezzio"

Posted on 6th July 2020 | View comments


Introducing Mini Mezzio : even quicker Mezzio applications! (believe it or not...)

I've always wanted setting up a Mezzio (formerly Zend Expressive) project to be even easier. For example, at the time of writing, Slim PHP homepage has what I think is an extremely simple usage code block:

<?php
use Psr\Http\Message\ResponseInterface as Response;
use Psr\Http\Message\ServerRequestInterface as Request;
use Slim\Factory\AppFactory;

require __DIR__ . '/../vendor/autoload.php';

$app = AppFactory::create();

$app->get('/hello/{name}', function (Request $request, Response $response, array $args) {
    $name = $args['name'];
    $response->getBody()->write("Hello, $name");
    return $response;
});

$app->run();

Whilst the Mezzio application setup process is actually very simple, it requires using the Mezzio Skeleton application, which encourages the best practices for a future-proofed setup.

There are times when I want to just spin something up even quicker, even something as simple as the Slim example above. At first, I created a PR to create a "minimal" application factory in mezzio/mezzio#43. However, many suggested this would be better as a separate component. Therefore, I present to you, Mini Mezzio:

$ composer require asgrim/mini-mezzio laminas/laminas-servicemanager mezzio/mezzio-fastroute

Then in public/index.php:

<?php

declare(strict_types=1);

use Laminas\Diactoros\Response\TextResponse;
use Laminas\ServiceManager\ServiceManager;
use Asgrim\MiniMezzio\AppFactory;
use Mezzio\Router\FastRouteRouter;
use Mezzio\Router\Middleware\DispatchMiddleware;
use Mezzio\Router\Middleware\RouteMiddleware;
use Psr\Http\Message\ResponseInterface;
use Psr\Http\Message\ServerRequestInterface;
use Psr\Http\Server\RequestHandlerInterface;

require __DIR__ . '/../vendor/autoload.php';

$container = new ServiceManager();
$router = new FastRouteRouter();
$app = AppFactory::create($container, $router);
$app->pipe(new RouteMiddleware($router));
$app->pipe(new DispatchMiddleware());
$app->get('/hello-world', new class implements RequestHandlerInterface {
    public function handle(ServerRequestInterface $request): ResponseInterface
    {
        return new TextResponse('Hello world!');
    }
});
$app->run();

This example I feel is almost as slimline as the Slim example; it allows you to assume a bunch of defaults, except for the choice of Router and PSR-11 Container.

If this is something that interests you, please check out the repository, which includes more documentation, and let me know how you get on:

Using middleware in Zend MVC

Posted on 12th May 2017 | View comments


For over a year, since 2.7, we have had the ability to use a single middleware in a Zend\Mvc-based application (if you're not familiar, that's basically "Zend Framework" as opposed to "Zend Expressive"). A nice advantage here is you can make a forward-port path to migrating across to Zend Expressive. Your config might look something like

<?php
declare(strict_types=1);

return [
    'router' => [
        'routes' => [
            'path' => [
                'type' => 'Literal',
                'options' => [
                    'route' => '/path',
                    'defaults' => [
                        'middleware' => \App\Actions\FooAction::class,
                    ],
                ],
            ],
        ],
    ],
];

The middleware FooAction would be a standard middleware (at that time, the http-interop style middlewares were not supported, but that's changed now as I'll explain):

<?php
declare(strict_types=1);

namespace App\Actions;

use Psr\Http\Message\RequestInterface;
use Psr\Http\Message\ResponseInterface;
use Zend\Diactoros\Response\JsonResponse;

final class FooAction
{
    public function __invoke(RequestInterface $request, ResponseInterface $response, callable $next = null) {
        return new JsonResponse([
            // ... some data ...
        ]);
    }
}

This change was great, and I did some work for a client who had started using the MiddlewareListener to attach a middleware to a route like this, and saw it in action. Over time I discovered a couple of flaws. Firstly, the matched route information was unavailable, so if you had a route matcher like /foo/:slug, there was no nice way to discover the value of slug from the matched route. So, dutifully I created patch #210 to resolve this issue, which was accepted and released in Zend\Mvc 3.0.4 and up.

Before long, I discovered another glaringly obvious problem: you could only ever have a single middleware added here. If you're familiar with middleware-style applications, this completely defeats the point: you can pipe your middleware to inject behaviour (such as authentication, error handling etc.) but this was not possible.

So, leveraging the existing functionality of Zend\Stratigility pipes, I heavily refactored the MiddlewareListener to instead create a pipe from the middleware definition from config. I made it backwards compatible in the sense that the configuration above would still work, but now you can attach multiple middlewares to a route, like so:

<?php
declare(strict_types=1);

return [
    'router' => [
        'routes' => [
            'path' => [
                'type' => 'Literal',
                'options' => [
                    'route' => '/path',
                    'defaults' => [
                        'middleware' => [
                            \App\Middleware\ExtractJsonPayload::class,
                            \App\Middleware\StoragelessPsr7Session::class,
                            \App\Middleware\VerifyIdentity::class,
                            \App\Actions\FooAction::class,
                        ],
                    ],
                ],
            ],
        ],
    ],
];

This patch recently got merged in Zend\Mvc 3.1.0 so you can now take advantage of this handy new feature. I also added support for middlewares that implement Interop\Http\ServerMiddleware\MiddlewareInterface too, so you can now write something like:

<?php
declare(strict_types=1);

namespace App\Actions;

use Interop\Http\ServerMiddleware\DelegateInterface;
use Interop\Http\ServerMiddleware\MiddlewareInterface;
use Psr\Http\Message\ServerRequestInterface;
use Zend\Diactoros\Response\JsonResponse;

final class FooAction implements MiddlewareInterface
{
    public function process(ServerRequestInterface $request, DelegateInterface $delegate)
    {
        return new JsonResponse([
            // ... some data ...
        ]);
    }
}

I provide development, consulting and training for Zend Expressive, Zend Framework, Doctrine and more. If you'd like to discuss your requirements, get in touch with me.